Every week, we send subscribers of the Resco News newsletter a technical tip on how to work with the admin and mobile solutions. Read this selection of five tech tips published over recent weeks to explore how you can enhance your Resco experience.
In this month’s edition, you will learn more about how to:
- #11: Use sync filters in online mode
- #12: Solve the Applying Form Rule – Variable Not Found error
- #13: Use React with JSBridge
- #14: Use styles in Report Designer
- #15: Reuse answers in questionnaires
#11 Sync filter used in online mode
Sync filters control which records to download to the offline database. As a result, they don’t restrict record availability in the online mode.
However, suppose you have an advanced sync filter restricting access to organization data at different levels (like business units, time, etc.). In that case, you can apply these restrictions online without reconfiguring them.
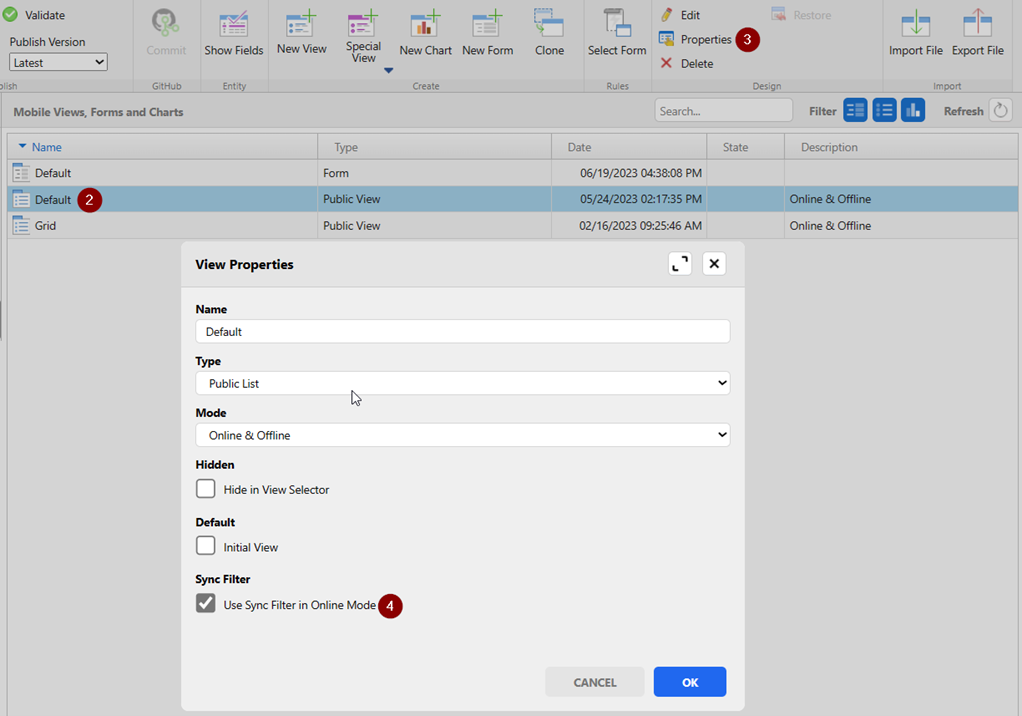
Simply enable the sync filter in online mode within the properties of each view. This ensures that your users see the same records in both online and offline modes.
- Launch Woodford.
- Go to the desired entity, and then select the view you want to apply the Sync filter for.
- Don’t open the view.
- On a toolbar, click Properties to open the View Properties dialog.
- Select option Sync Filter > Use Sync Filter in Online Mode.

Find out more about Sync Filter on Resco Wiki or enroll in Synchronization & Sync Dashboard on Resco Academy!
#12 Error Applying Form Rule – Variable Not Found
If you encounter this error in your form rules, it typically means that the record loaded into the variable doesn’t contain any data.
That results in an undefined variable. It’s advisable to use conditions to verify if the variable contains data to prevent such errors.
Additionally, when working with data from loaded record fields, always check if the field you intend to assign a value contains data.
This practice helps avoid these types of errors and ensures smoother execution.
Find out more by enrolling in our Business Logic course on Resco Academy!

#13 Use React with JSBridge
Resco JavaScript Bridge is a popular tool among our partners for three main reasons: fast access to data, enhanced control over the user interface, and the ability to create complex business logic, even offline.
Its compatibility with third-party JavaScript libraries, like React, makes its integration easier. Now, we have simplified this process even more.
On Resco Wiki, you can find a new detailed use case React with JSBridge, including a sample React project and steps needed for building and integrating React content in Resco mobile apps.
How to accelerate the process of adopting React:
- Visit the dedicated site on Resco Wiki
- Download the sample from the part Sample application
- Unzip the zip file
- Go to the application’s folder in the terminal and install the required dependencies using the npm i command
- Continue from the section Build your React application
If you’re unfamiliar with JSBridge, we recommend enrolling in our Introduction to Resco JavaScript Bridge on Resco Academy!
#14 Useful insights into styles in Report Designer
Report Designer provides various customization options for mobile reports, including styles. Here are some short tips to get you started:
- In contrast to Woodford, where styles are shared across an entire app project, Report Designer uses unique styles per report
- Exporting your style library to any project or organization is a simple process. We recommend initially setting up a few fundamental styles and reusing them across all your reports. When necessary, you can create new styles by duplicating existing ones
- While assigning a style, you need to distinguish between attributes applied at the Grid and Cell levels. Cell alignments and Font attributes are applied from the style set in the Cell properties
Also, remember, Grid borders define the borders of the entire grid, not just individual cells. If you wish to apply borders to specific cells, you must assign the respective style at the cell level.
We have prepared a small set of basic styles for your convenience in the Report Designer exercises. Feel free to utilize them in your projects.
Learn by practicing with our short exercises in Resco Academy.
#15 Reuse answers in questionnaires
Reusing answers from previous inspections can save time and reduce the likelihood of errors. It is essential, though, to specify the relevant answers for reuse. This tip illustrates the breadth and depth you can explore.
- Open your questionnaire in the Questionnaire Designer.
- Navigate to Questionnaire properties > Questionnaire > Reuse Answers.
- Select the option relevant to your use case:
- Never: Do not reuse
- First Match: Take answers from the first completed questionnaire that the system can find
- Ask User: User can decide whether to prefill answers or not
- Select by User: The user can select from a list of previously completed questionnaires
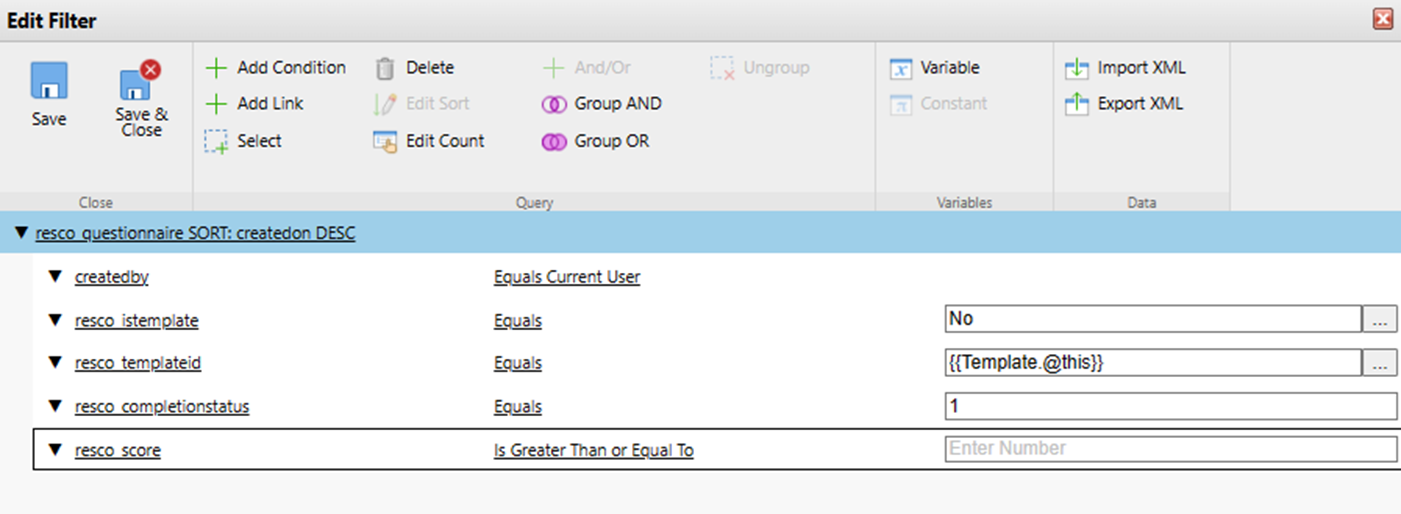
- Modify the filter in Reuse Fetch based on your requirements (for example, only from questionnaires that score higher than or equal to
- Enable Reuse on the Question level.

Learn more on Resco Wiki or by enrolling in the Resco Inspections course on Resco Academy
How to receive a new tech tip every week
In this blog, we’ve shared the first five tips that will help you on your way to becoming a Resco pro. You’ve learned how to jump into using React with JSBridge, streamline questionnaires, customize reports, and more. But the fun doesn’t have to stop here.
By subscribing to the Resco Newsletter, you’ll get a handy tech tip delivered right to your inbox every week. You can subscribe by filling out the form in the footer of the page.
