“In the end, CRM is only as good as the data you put into it,” said one of our customers just a few months back.
But how do you ensure your sales team, service technicians, or other mobile CRM users will indeed properly fill out the fields, to get relevant insights and be able to initiate the next steps in your customer management process? Especially if these fields are not set as required in your Microsoft Dynamics CRM either?
Using Resco Mobile CRM, there are a few simple ways of making a field (or fields) required in the app. And it’s just a matter of setting up a few form rules via the app’s Woodford configurator tool. Let’s take a closer look.
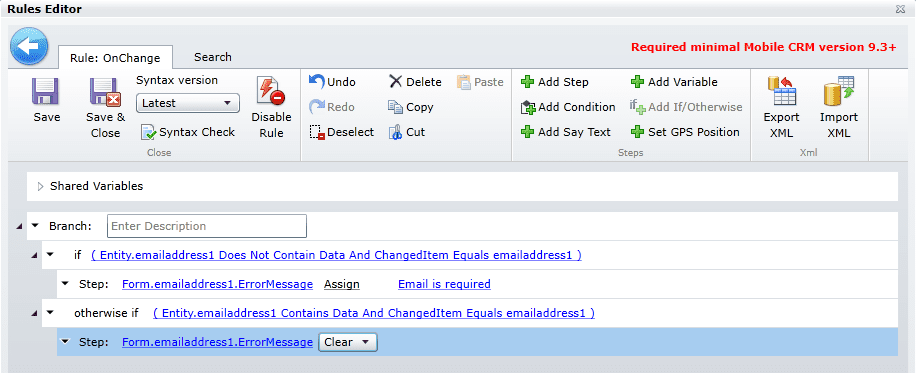
1. You can utilize the OnChange rule to highlight a field when it does not contain correct field data. It enables you to specify the data that is expected in the field. E.g. for an e-mail field the correct field data would be any e-mail address in a typical e-mail format, such as abc@example.com.
However, if a user tries to save the record without entering the correct data even after the field has been highlighted, the app will display an error message and the save will not be performed.

When setting up the OnChange rule for this scenario, make sure you will use the ChangedItem conditions, which ensure the rule will be triggered only when your chosen field is modified. Otherwise, the OnChange rule would be triggered on change of any of the fields. With simple rules (like in our e-mail address example) it is not that urgent, but in case of more extensive rules it can cause slow loading times and slower responses from the Resco Mobile CRM app.
Also, if in the Step part of the rule you accidentally use a value for a different field, it may cause a loop and crash the application. And since the OnChange rule is triggered after each modification of your chosen field, you need to clear the error message when the field data meets the required conditions.
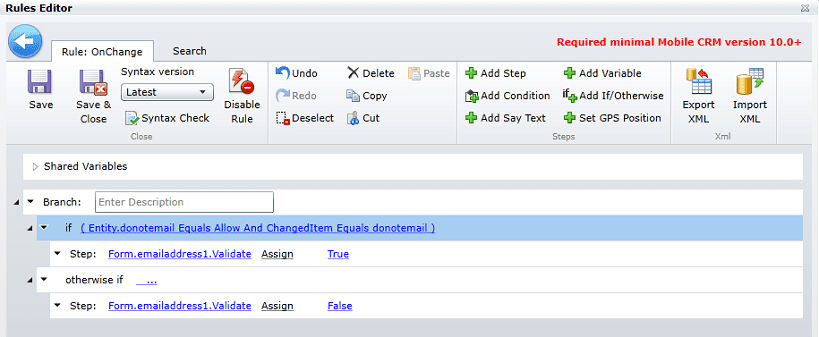
2. It is also possible to use the OnChange rule and set a simple validation for a field. In that case the app will not check what the user enters into the field, only whether the field contains data. For this, you need to specify when the field requires validation (when empty) and when the field no longer needs to be validated (when filled out). In the screenshot below, when the field Do Not Allow Emails is set to Allow (allow sending emails), the Email Address field is always required. So if the user does not enter the e-mail address, the app will not allow him/her to save the changes to the record.

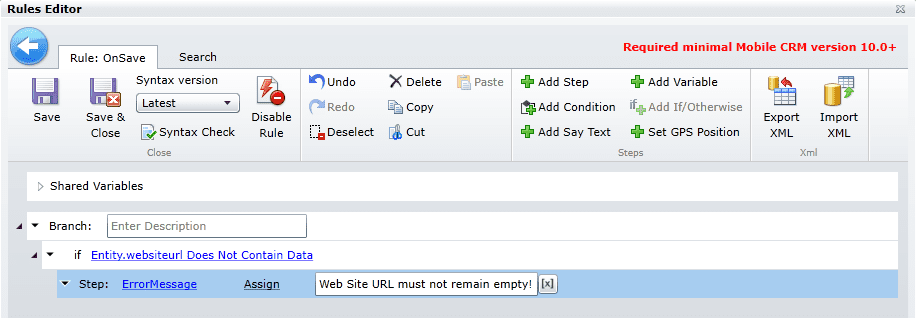
3. You can also utilize the OnSave rule to check any field’s data, but without highlighting the field when the condition is not met. In case of the OnSave rule validation, the rule is triggered when the user hits the save command, and when the field value does not meet the condition, error message is displayed to the user and the save process is cancelled.

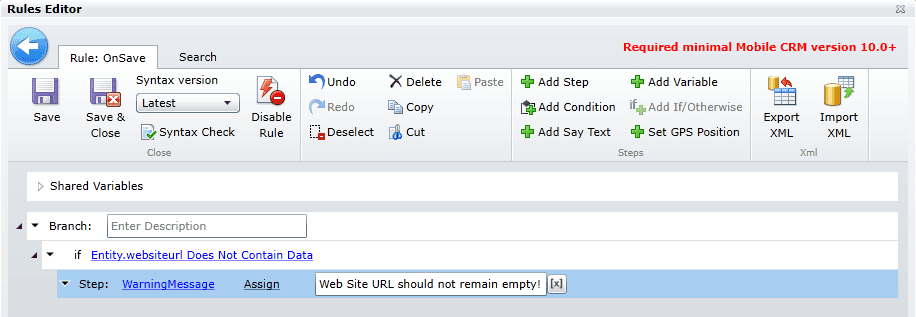
4. The last option for validation is to use the OnSave rule again and display a warning message to the user if the specific field doesn’t meet the required conditions. It is similar to the aforementioned error message, but in this case users can decide to continue in saving the value entered, despite the message.

Still not sure how to set up required fields in your Resco Mobile CRM? Then just e-mail us at mobilecrm@resco.net, we’re here to help with all your inquiries about the app and its customization.
